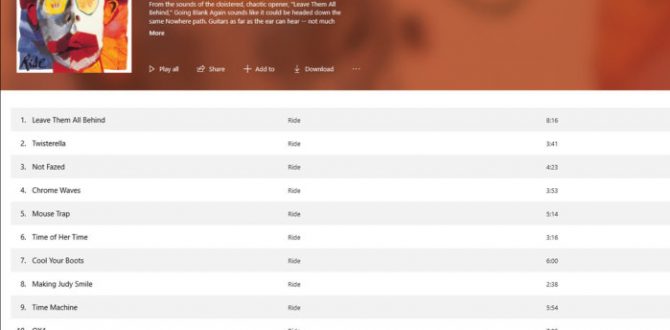
Tired of seeing “unknown track” by “unnamed artist” on your favorite music player? We’ll show you how to automatically identify, tag, and properly rename all your mystery tracks and albums to whip your music library into shape.
While streaming is quickly becoming the most popular way to enjoy music, many of us prefer to own our favorite tunes, rather than lease them. Purchasing and ripping CDs, or buying digital tracks to download, remains the best way to build large digital music collections that you can listen to anytime, anywhere, on almost any device, even if you don’t have an internet connection.
Most CD-ripping applications will automatically attach metadata—literally data that describes other data—to your tracks. Music metadata includes track names, album and artist details, and other information that help you navigate your music library. Some apps will add artwork and even lyrics, too.
If you purchase and download music—whether it be from Amazon, iTunes, or a boutique outlet like 7Digital that sells high-resolution audio tracks, including MQA files—you’ll find that most distribute tagged files.
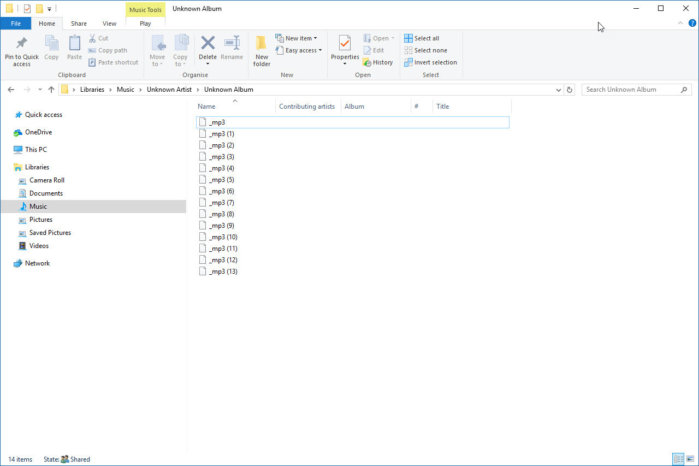
If you’re like most people, however, you probably own some obscure tracks that never quite made the music database services from which these apps pull their metadata. Maybe you have a collection of tracks you ripped many years ago, when these services weren’t available, or maybe they’re your own works. Either way, I’ll bet you have more than a few tracks that pop up in your music player as “Unknown Track” by “Unnamed Artist.”
 Terry Walsh/TechHive
Mislabeled tracks can be a pain to manage.
If you’re as geeky about music as I am, you’ll find unlabeled or mislabeled tracks really aggravating. The answer is metadata management—the ability to add, edit, change, and delete the metadata stored with audio files. You could try listening to every mislabeled track, figure out exactly what obscure remix it is, look up the official track listing, and then use a tag-editing app to update each file. But that’s going to take a lot of time. Allow me to show you a smarter approach.
What if there was an app that could “listen” to a selection tracks in your media library, compare the results to a worldwide music database, then automatically retrieve detailed track, album and artist information for you? What if it could also update tags and file names for you, and then relocate the files to an appropriate location in your music collection?
Introducing MusicBrainz Picard
Say hello to MusicBrainz Picard, my go-to app for music metadata management. It does everything I mentioned above and is completely free to download and use on Windows, MacOS, and Linux. Picard is a front-end to the MusicBrainz database (http://MusicBrainz.org/), a crowdsourced encyclopedia that collects music metadata and distributes it to the public under an open license.
 Terry Walsh/TechHive
MusicBrainz Picard is the answer to metadata misery.
Picard cleverly “listens” to your music courtesy of an associated service, AcoustID, which is used to analyze and identify tracks via a unique audio “fingerprint.” Right now, there are almost 34 million fingerprints in the AcoustID database, with between 15- to 20 thousand new entries generated each day. Again, the service is completely free to use, hosting around five million searches per day.
Together with AcoustID, Picard can identify and tag a range of audio file formats, including MP3, FLAC, OGG, M4A, WMA, and WAV, so there’s no longer any excuse for having a mislabeled music library.
Navigating MusicBrainz Picard
Once you’ve downloaded and installed Picard from the developer’s website (yes, it is named after Jean-Luc), open it up and let’s find some music to tag. Picard can manage local audio files as well as those stored elsewhere on the network, such as a NAS box. Working with network files can incur a small lag—particularly with large libraries—as files are read and written to across the network, so I find it best to work with a small selection of albums at a time.
 Terry Walsh/TechHive
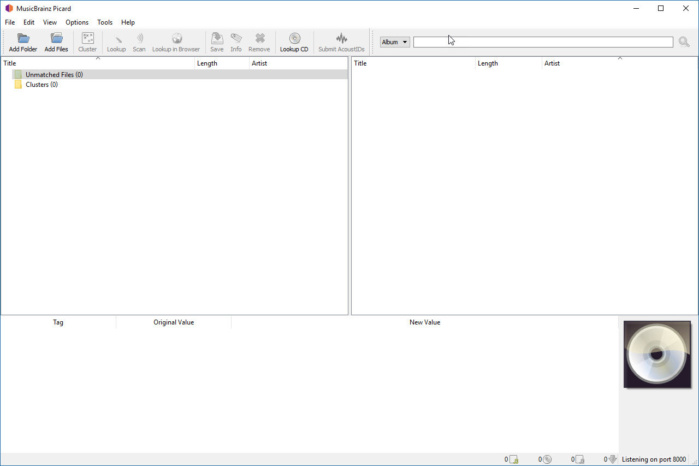
The MusicBrainz Picard user interface.
Picard’s interface consists of three panes. On the left is a file browser, used to select albums and tracks for analysis. When tracks have been identified, tags will be downloaded from the MusicBrainz database and then displayed in the right pane. Highlight a file and the bottom pane displays any currently saved metatags alongside a preview of how the tags will change once updated. To the right, you can view cover art associated with a track or album.
Analyzing album folders
A task bar at the top of the window offers a series of icons used to control the application. The Add folder icon is used to point Picard to your music collection. As mentioned, Picard runs more quickly if you work with a single album or a few albums at a time, but you could ask it to chew through your entire library, should you wish. Alternatively, select Add Files to analyze a small number of tracks. Click the Add Folder button and choose any album folder from your library.
 Terry Walsh/TechHive
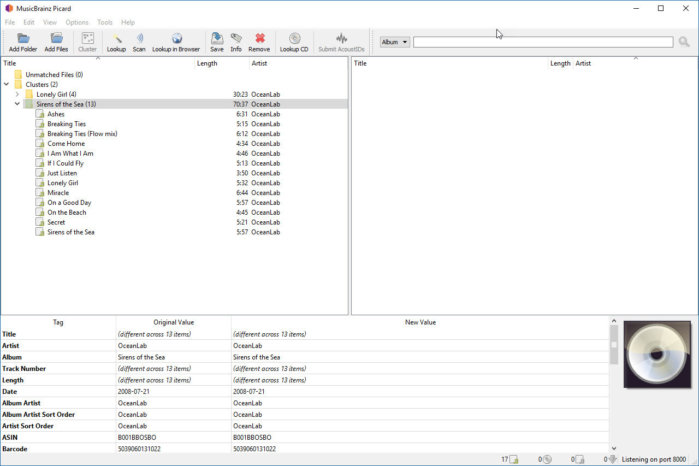
The folder is added to the left pane.
In this first example, we’ll work with an album that has already been tagged, as it’s easier to see what’s happening at each step. I’ll follow that with an untagged example.
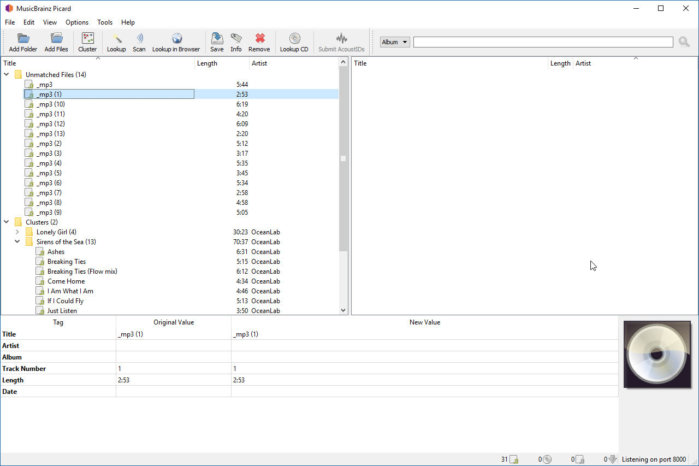
Your selected folders are placed in the left pane—use the drop-down arrow adjacent to the folder name to expose the files within. As these files have been previously tagged, it’s obvious what’s included in the folder. But note that the folder has been placed in the Clusters category. This means that Picard has analyzed the existing metatags and recognizes that these tracks belong together in an album. Tracks that are not initially recognized by existing metatags are placed in the Unmatched Files category.
 Terry Walsh/TechHive
Adding Unmatched Files.
Manually Adding or Editing Tags
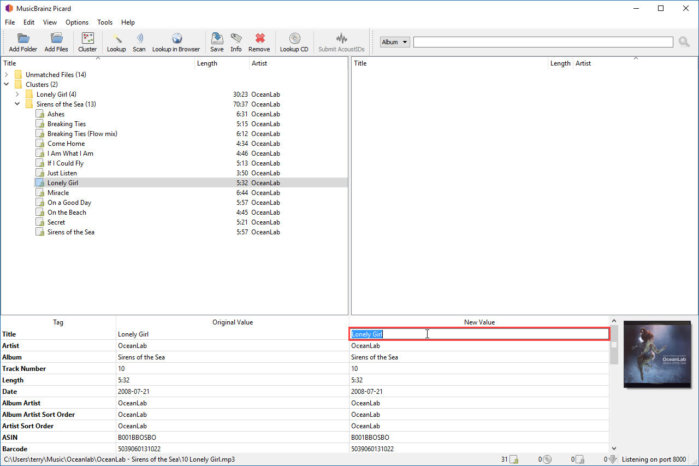
Left-click on a track in the left pane and you can view any existing tags at the bottom of the window. It’s easy to add or manually edit tags simply by clicking on a row in the New Value column and entering the new tag content. On occasion, an album may not be listed in the MusicBrainz database (particularly if it’s a new release), so manual tagging offers a handy workaround. You can save time adding the same tag to all tracks (such as the artist or album name) by highlighting the folder in the left pane when you edit the tag. Click the Save icon in the task bar to lock in your changes.
 Terry Walsh/TechHive
Manually editing tags.
Searching for tracks in the Musicbrainz database
Automatic tagging, however, is much more fun. There are two primary options for locating an album in the MusicBrainz database. A quick search can be launched by highlighting an album or file in the left pane, then hitting the Lookup icon in the task bar. This type of search uses your existing metatags to query the MusicBrainz database for a match. This can be a great option for checking the accuracy of your tags, or adding missing tags to a partially tagged album. You’ll be surprised just how many tags are included for each release in the database.
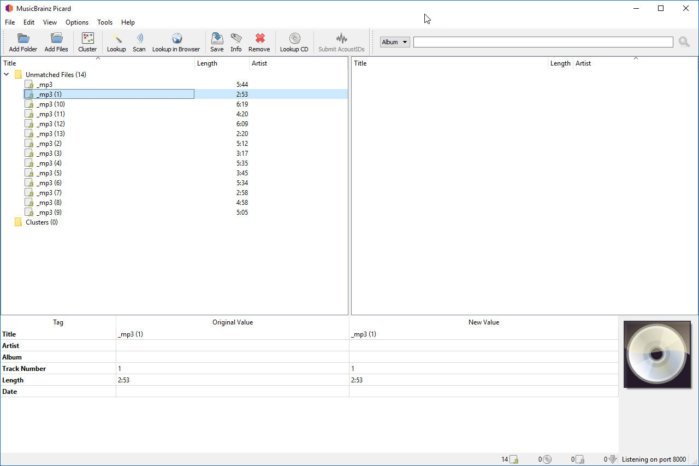
But to see the real magic in action, try the Scan button instead. Picard analyses a sample of audio in each track, generating an AcoustID fingerprint that can be matched in the database. It’s an ingenious solution for identifying unlabeled or unknown tracks. Let’s give it a go with an untagged, mystery album.
 Terry Walsh/TechHive
No metatags, generic file names—what might this be?
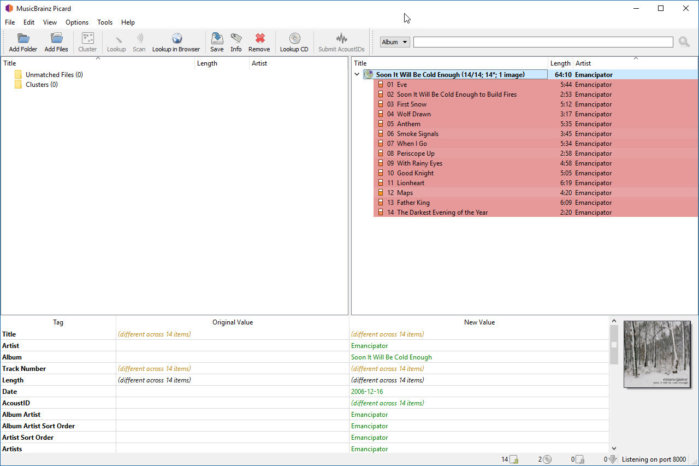
Despite the lack of tags, Picard may still recognize that tracks belong together as they’re stored in a single folder. Click the Cluster button to group the tracks accordingly. Now click Scan to have Picard analyze your mystery album. The search should take just a few seconds.
 Terry Walsh/TechHive
The audio is analyzed and an album match is found.
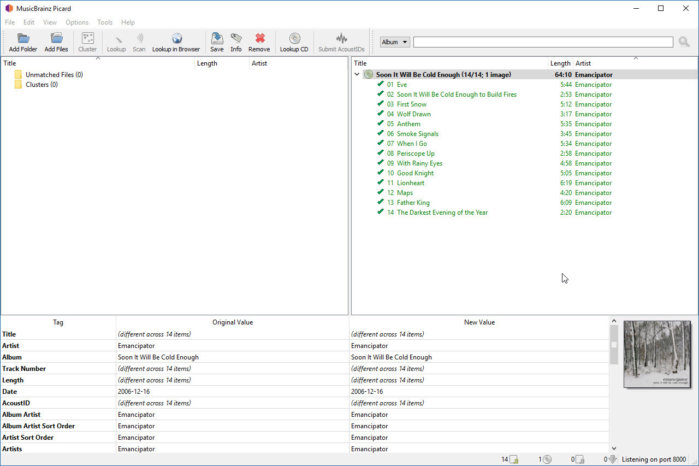
If a successful match is made, the album, artist, and track details will be displayed in the right pane. The tracks are highlighted in red as no metadata has been written to the files. Files that already have existing, correct tags are highlighted in green.
Click on a track and you can preview how its metatags will be updated once they are saved. Again, you can make any manual edits you wish, but you should find that the database listing is comprehensive. When you’re happy, click the Save icon to update your metatags.
 Terry Walsh/TechHive
The new metatags are saved to the audio files.
Automatically renaming and relocating files
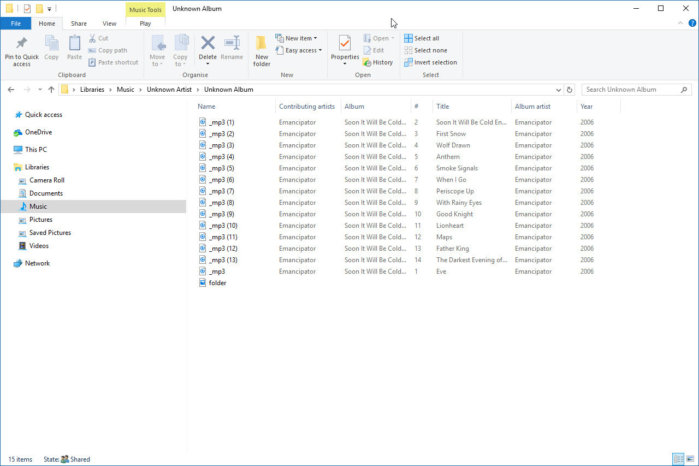
Picard has correctly identified and tagged the mystery files, but a quick check in Windows File Explorer shows that we still have generic file and folder names.
 Terry Walsh/TechHive
The new metatags are in place, but we can do better with file and folder names.
Picard can automatically rename audio files, using data extracted from their metatags, and move files to alternative folders on a local PC or NAS box. This feature makes music library management even more convenient. You could create a temporary folder, holding all your untagged audio files, from which you feed Picard. Once the tracks have been identified and tagged, Picard could then rename the files and move them into an appropriate location in your music library; for example, in an album sub-folder under the artist name.
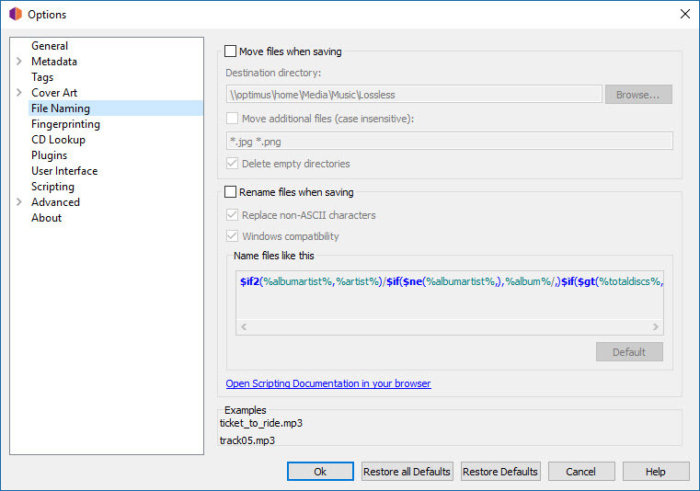
By default, Picard will not overwrite file names or move files, but you can ask it to do so in the Options menu. Head to the File Naming section, where you’ll see options for configuring file name formats and a destination for your saved files.
 Terry Walsh/TechHive
Configuring file-naming options.
Check the box next to Move files when saving, then use the Browse button to select the destination. Note the Move additional files setting, which can be used to relocate other file types in the folder; for example, your cover art images. Any file type not listed in this section will be left behind.
The Rename files when saving box should also be checked. Picard includes a swathe of formatting options for renaming files. The Name files like this panel allows you to edit how file names are formatted, using scripting parameters. It allows you to match the format of your existing music library, but can be complicated (there are more details on the parameters at the Picard website https://picard.musicbrainz.org/docs/scripting/).
That said, I find Picard’s default format (Artist Name/Album Name/Track Number – Track Name) works well. If you do wish to edit the format, start by moving the existing parameters around to get a feel for how they work. Keep an eye on the Examples panel, which provides a live preview of how the file name will look when saved.
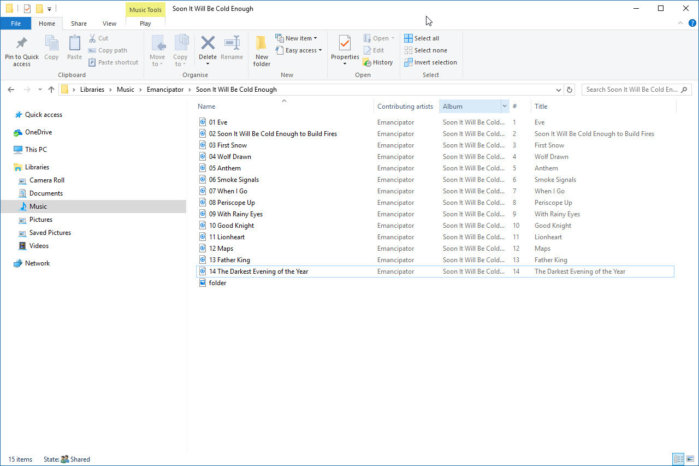
Once you’ve enabled and configured these settings, click Ok, then save your tracks once again in the main Picard app window. Head back to File Explorer and you should notice that the tracks have been have been renamed and relocated from the Unknown Artist/Unknown Album folder to your chosen destination.
 Terry Walsh/TechHive
The mystery tracks are tagged, renamed and relocated.
Coming in part 2: Advanced features and settings
That covers the basics of music metadata management. Armed with these tips, you’ll be able to sort out even the messiest music library. In part 2, I’ll explore some of Picard’s more advanced features, which can make tagging even more accurate and convenient.
This story, “How to master your music metadata (Part 1)” was originally published by
TechHive.
